
👭 通过利用明亮/暗黑模式,以1个网站的成本构建2个Next.js网站
最近,Gato GraphQL 团队发布了 Gato Plugins,这是 Gato GraphQL 的姊妹站点。
你会发现两个站点几乎一模一样!唯一的区别是配色方案:Gato GraphQL 采用暗色主题,而 Gato Plugins 采用亮色主题。
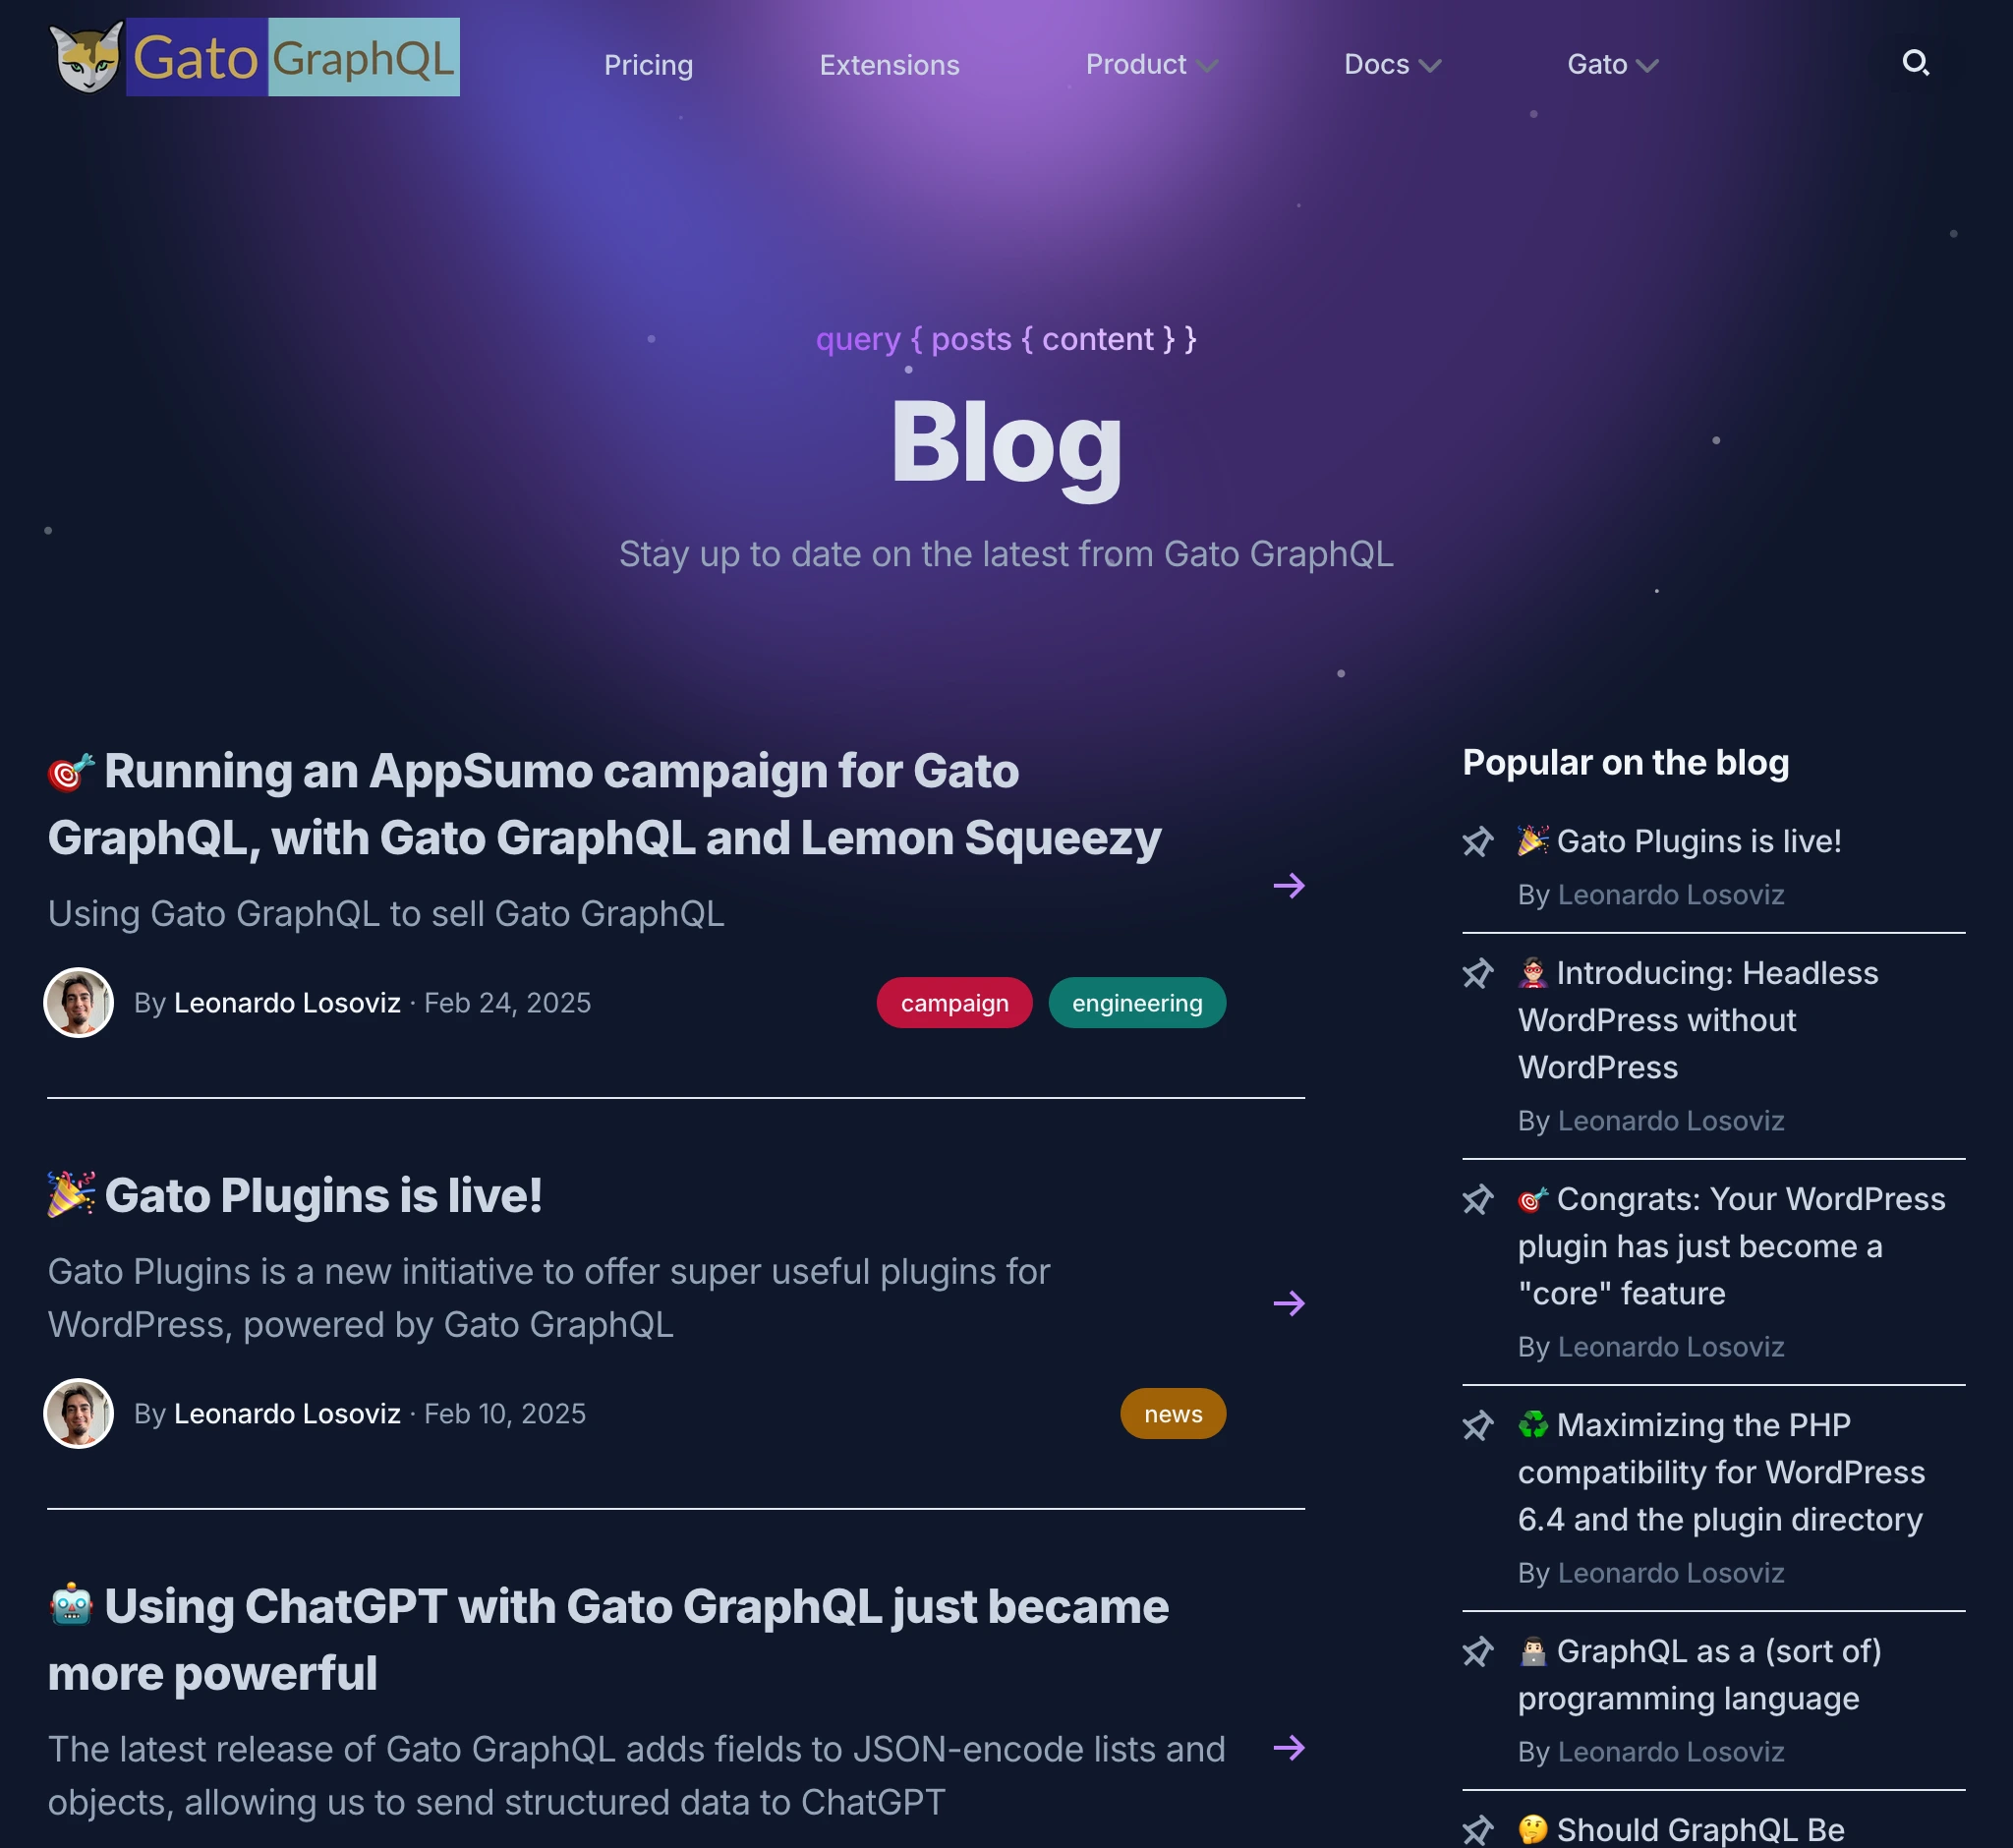
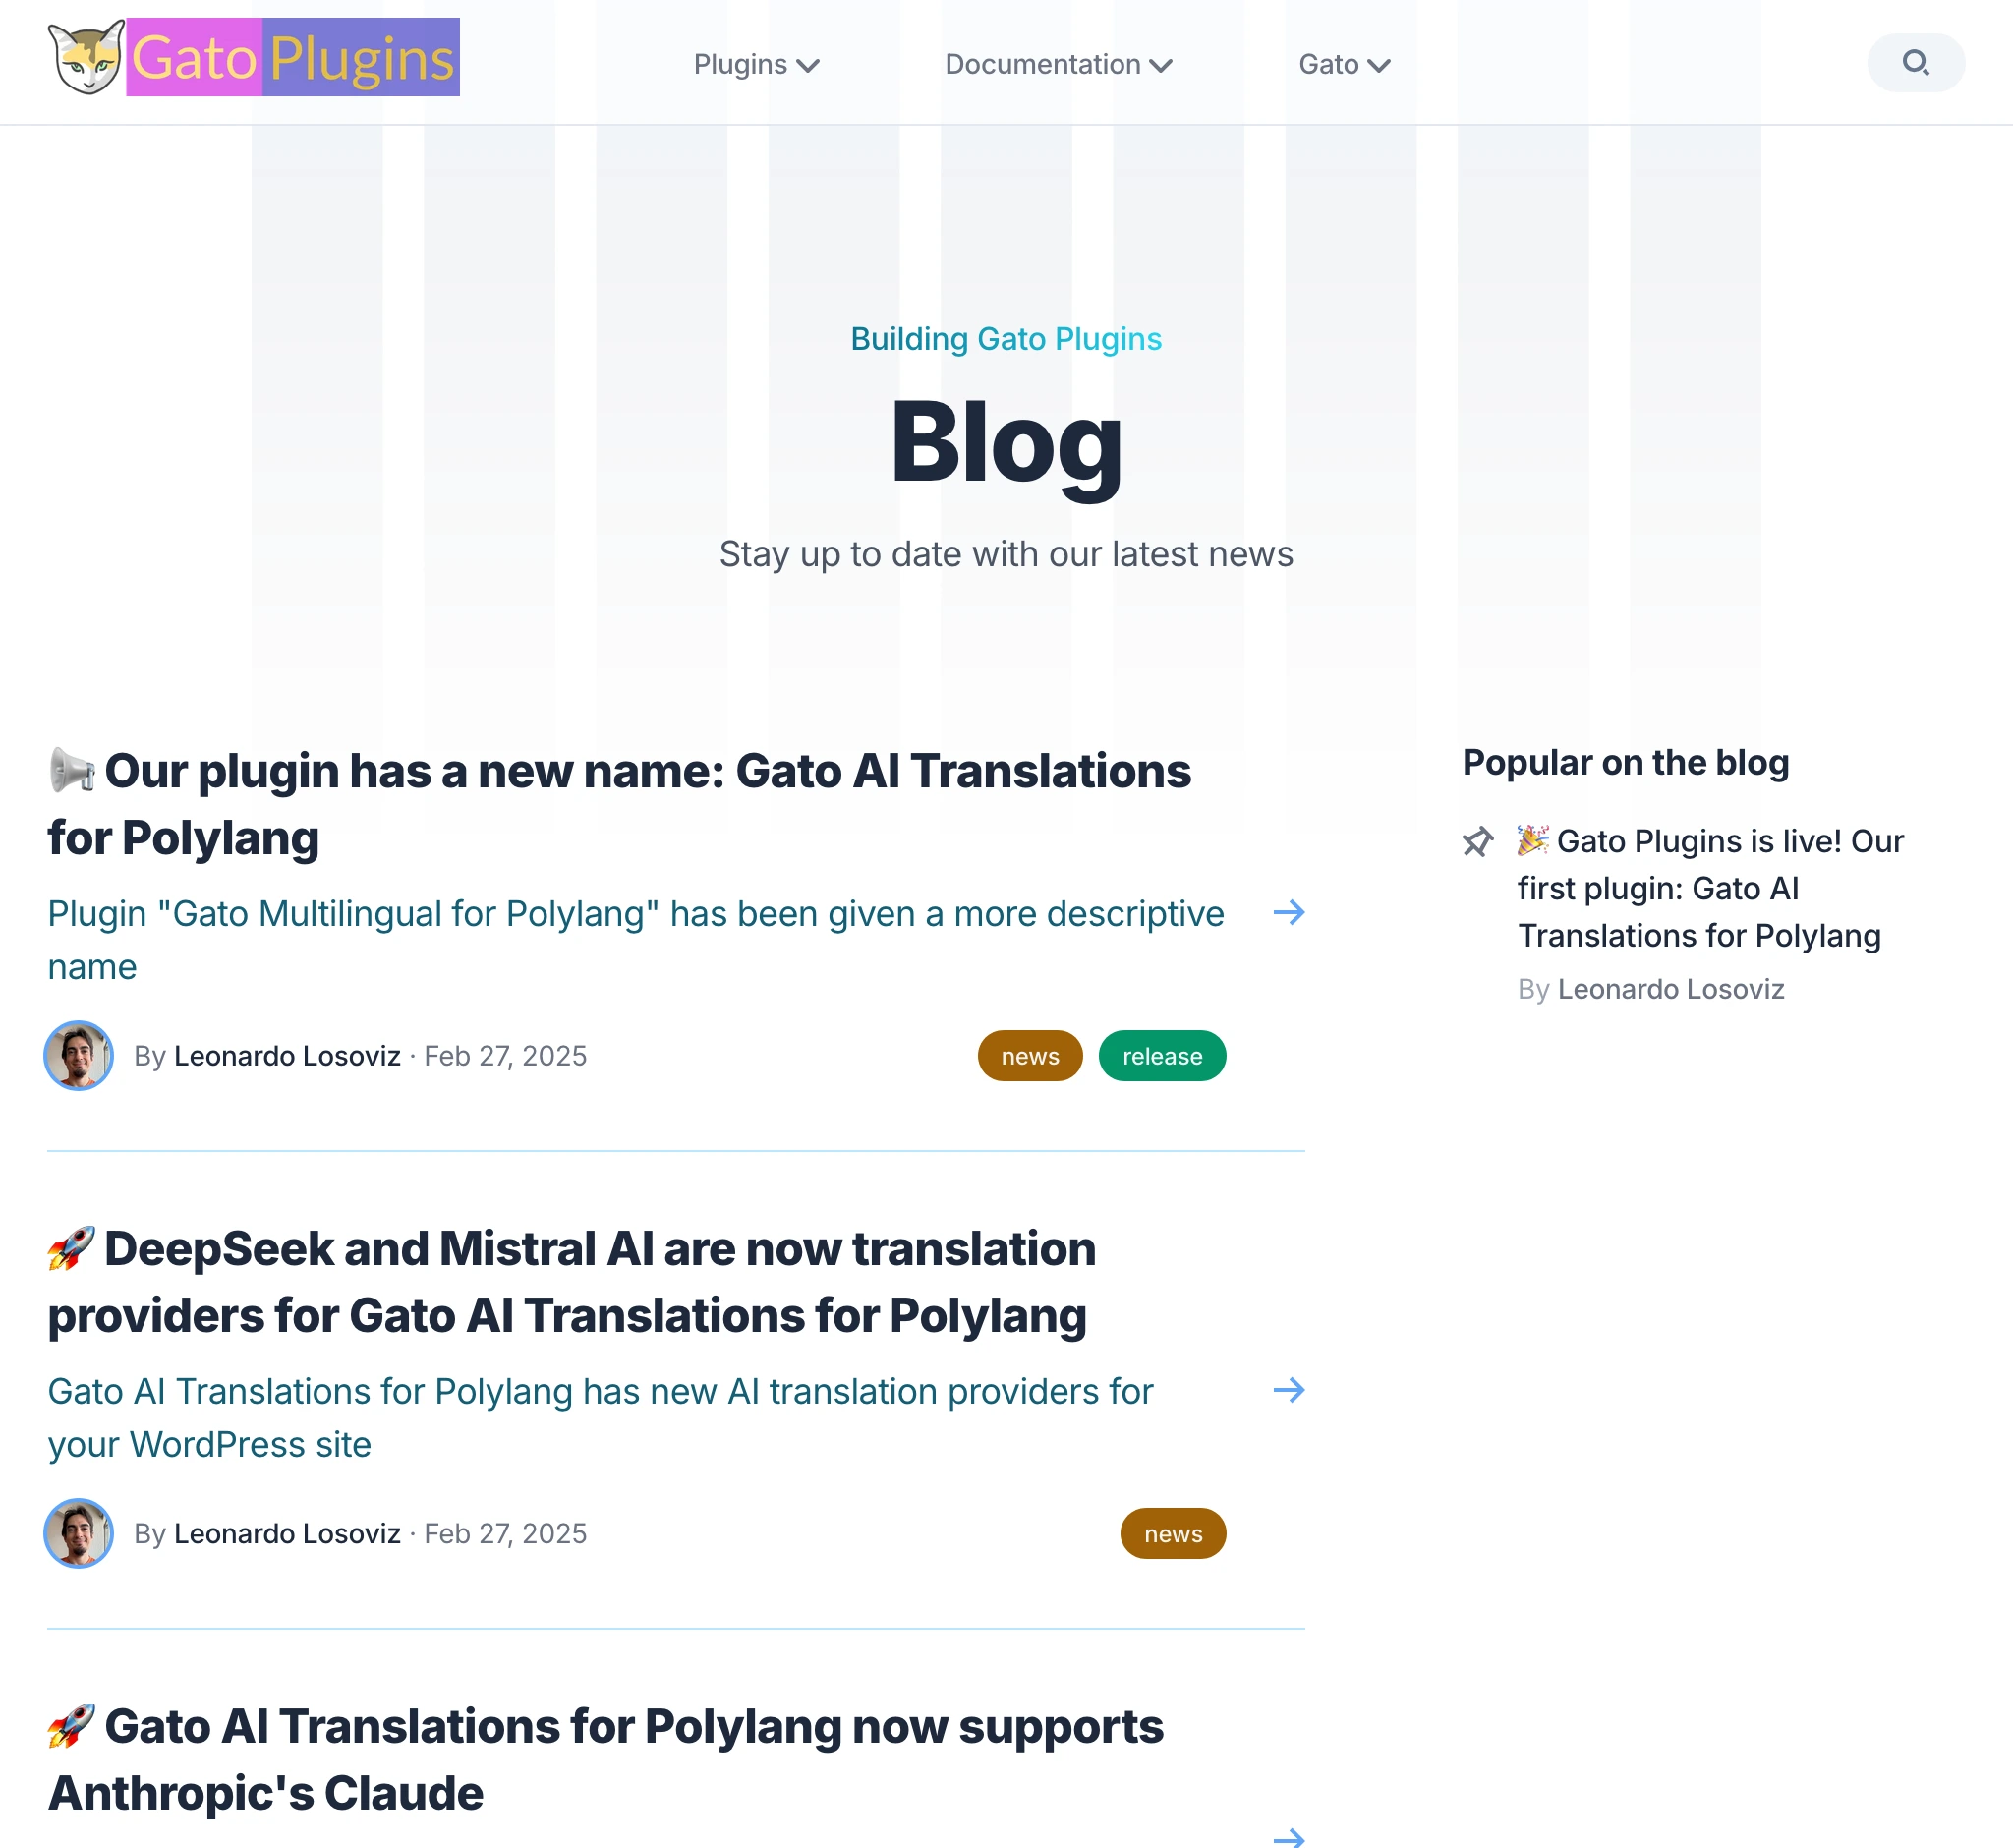
两个站点的博客板块完全相同:
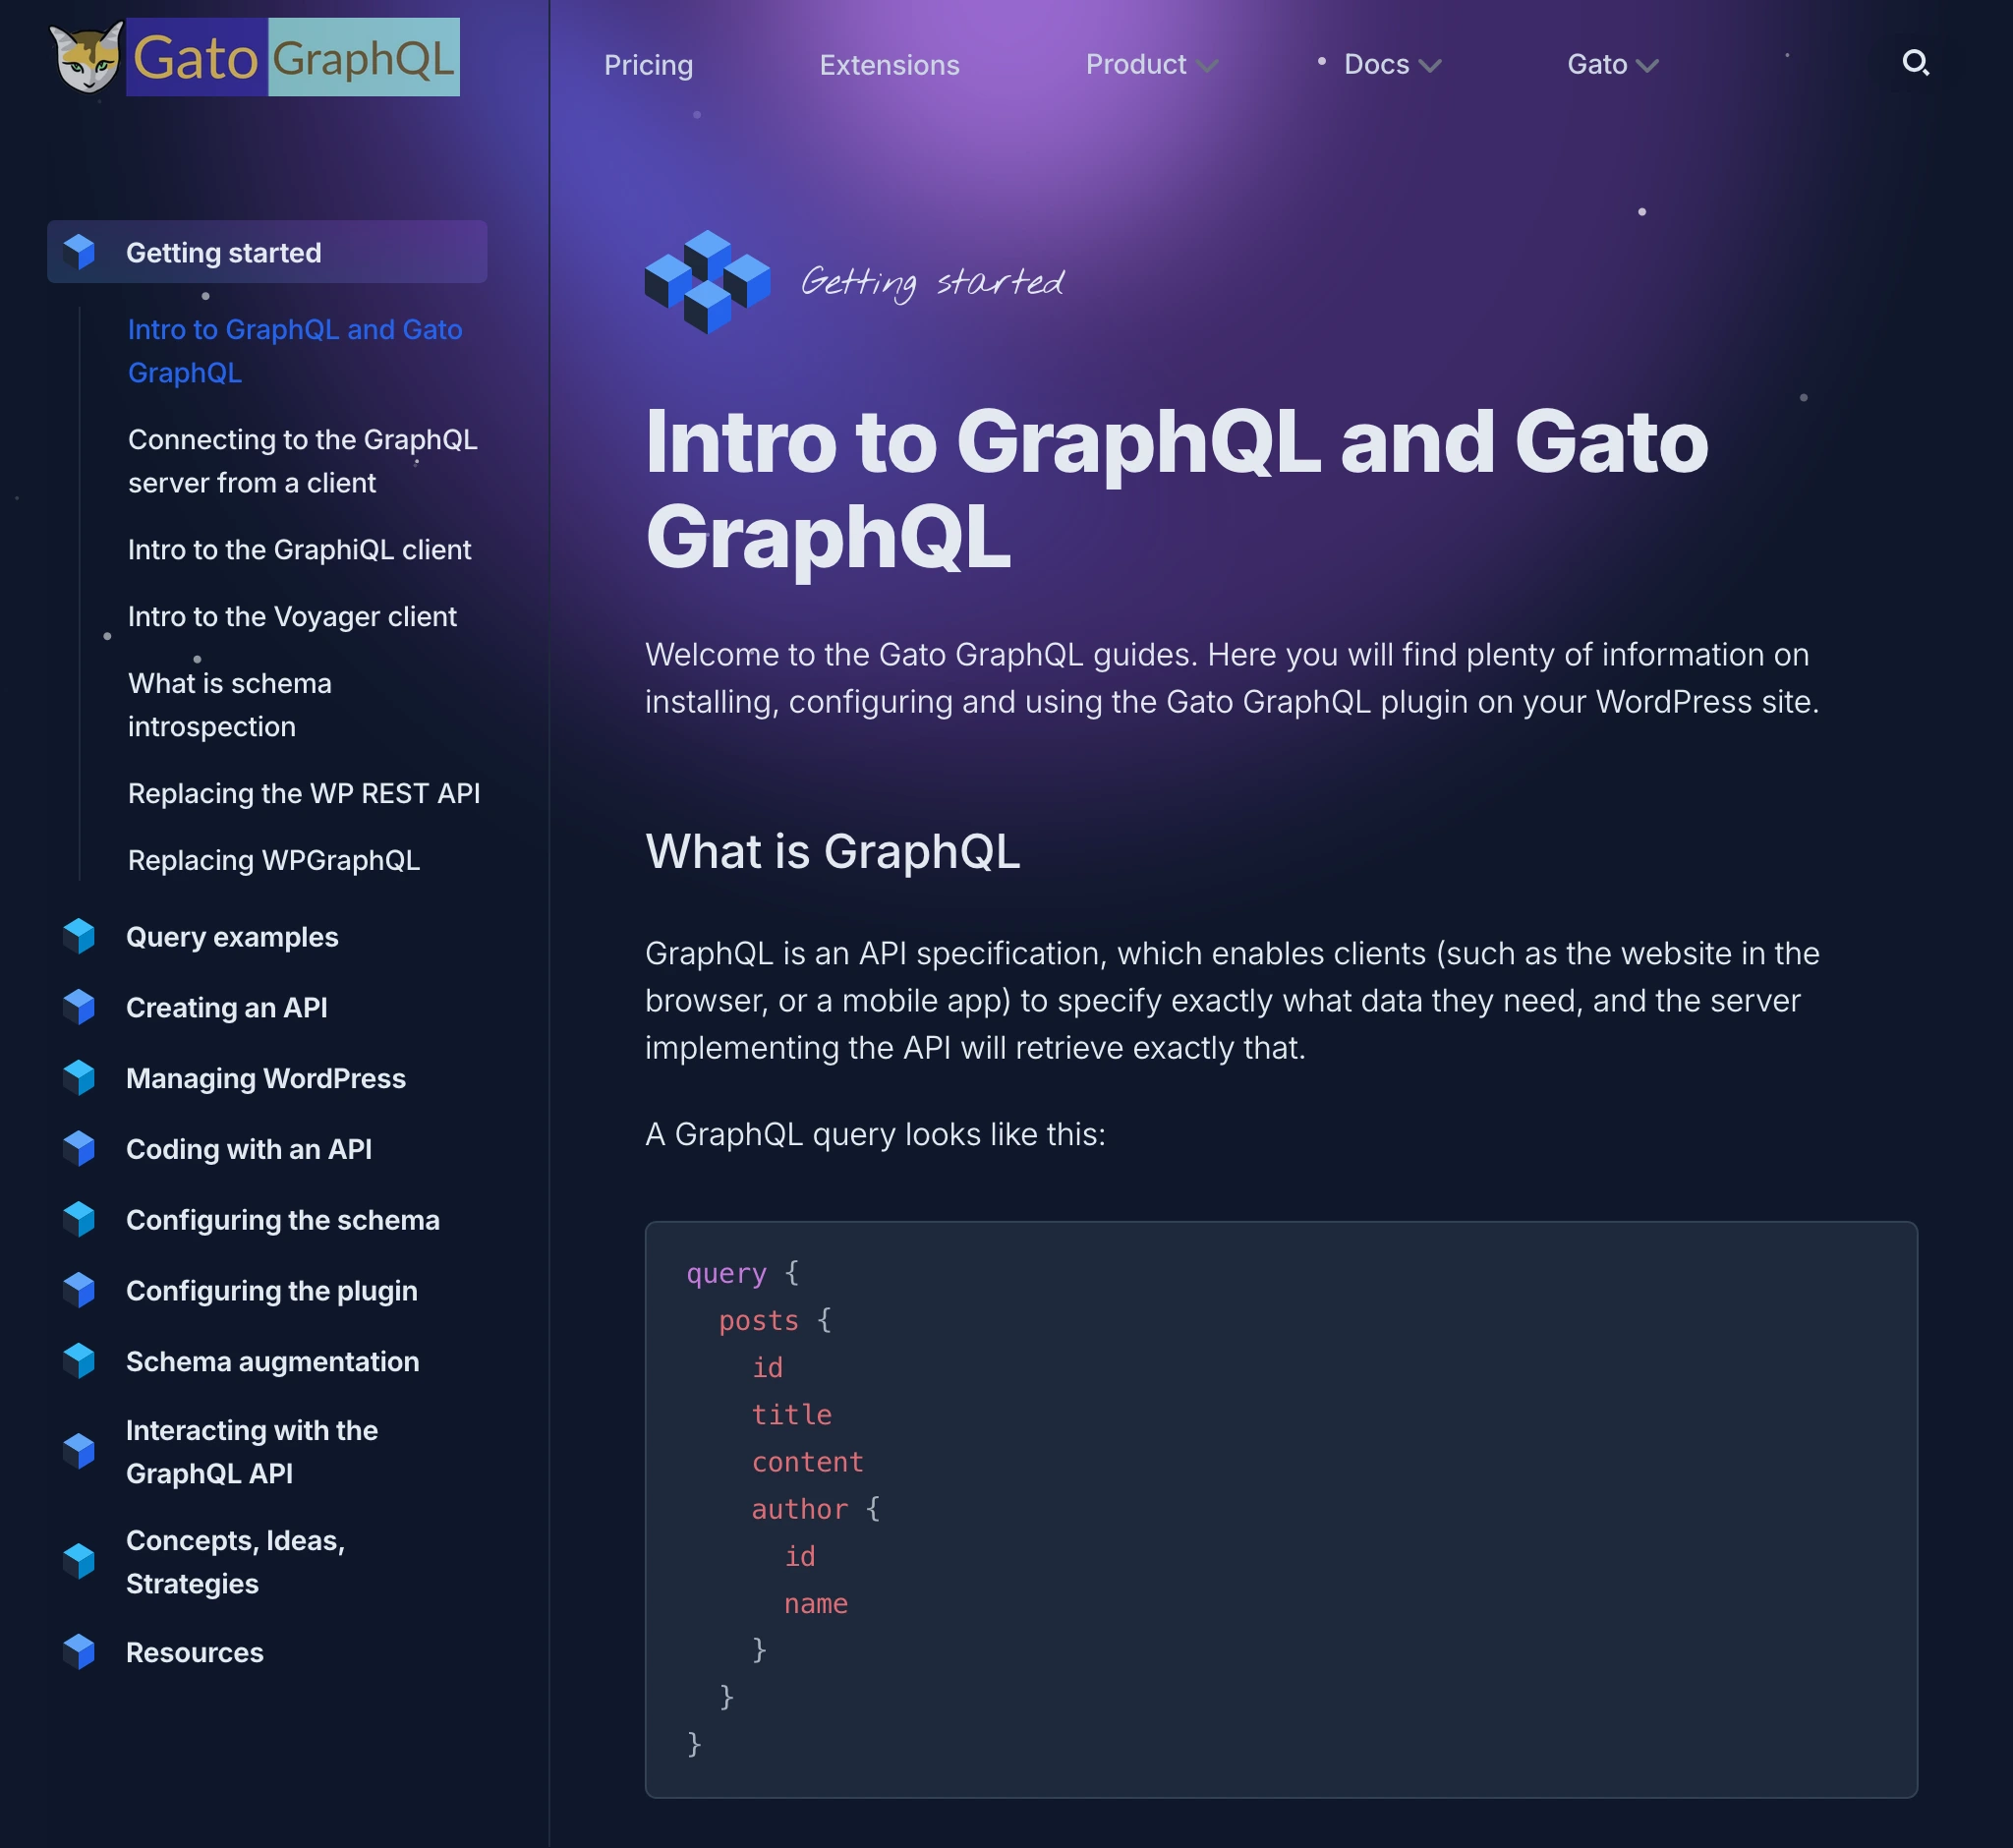
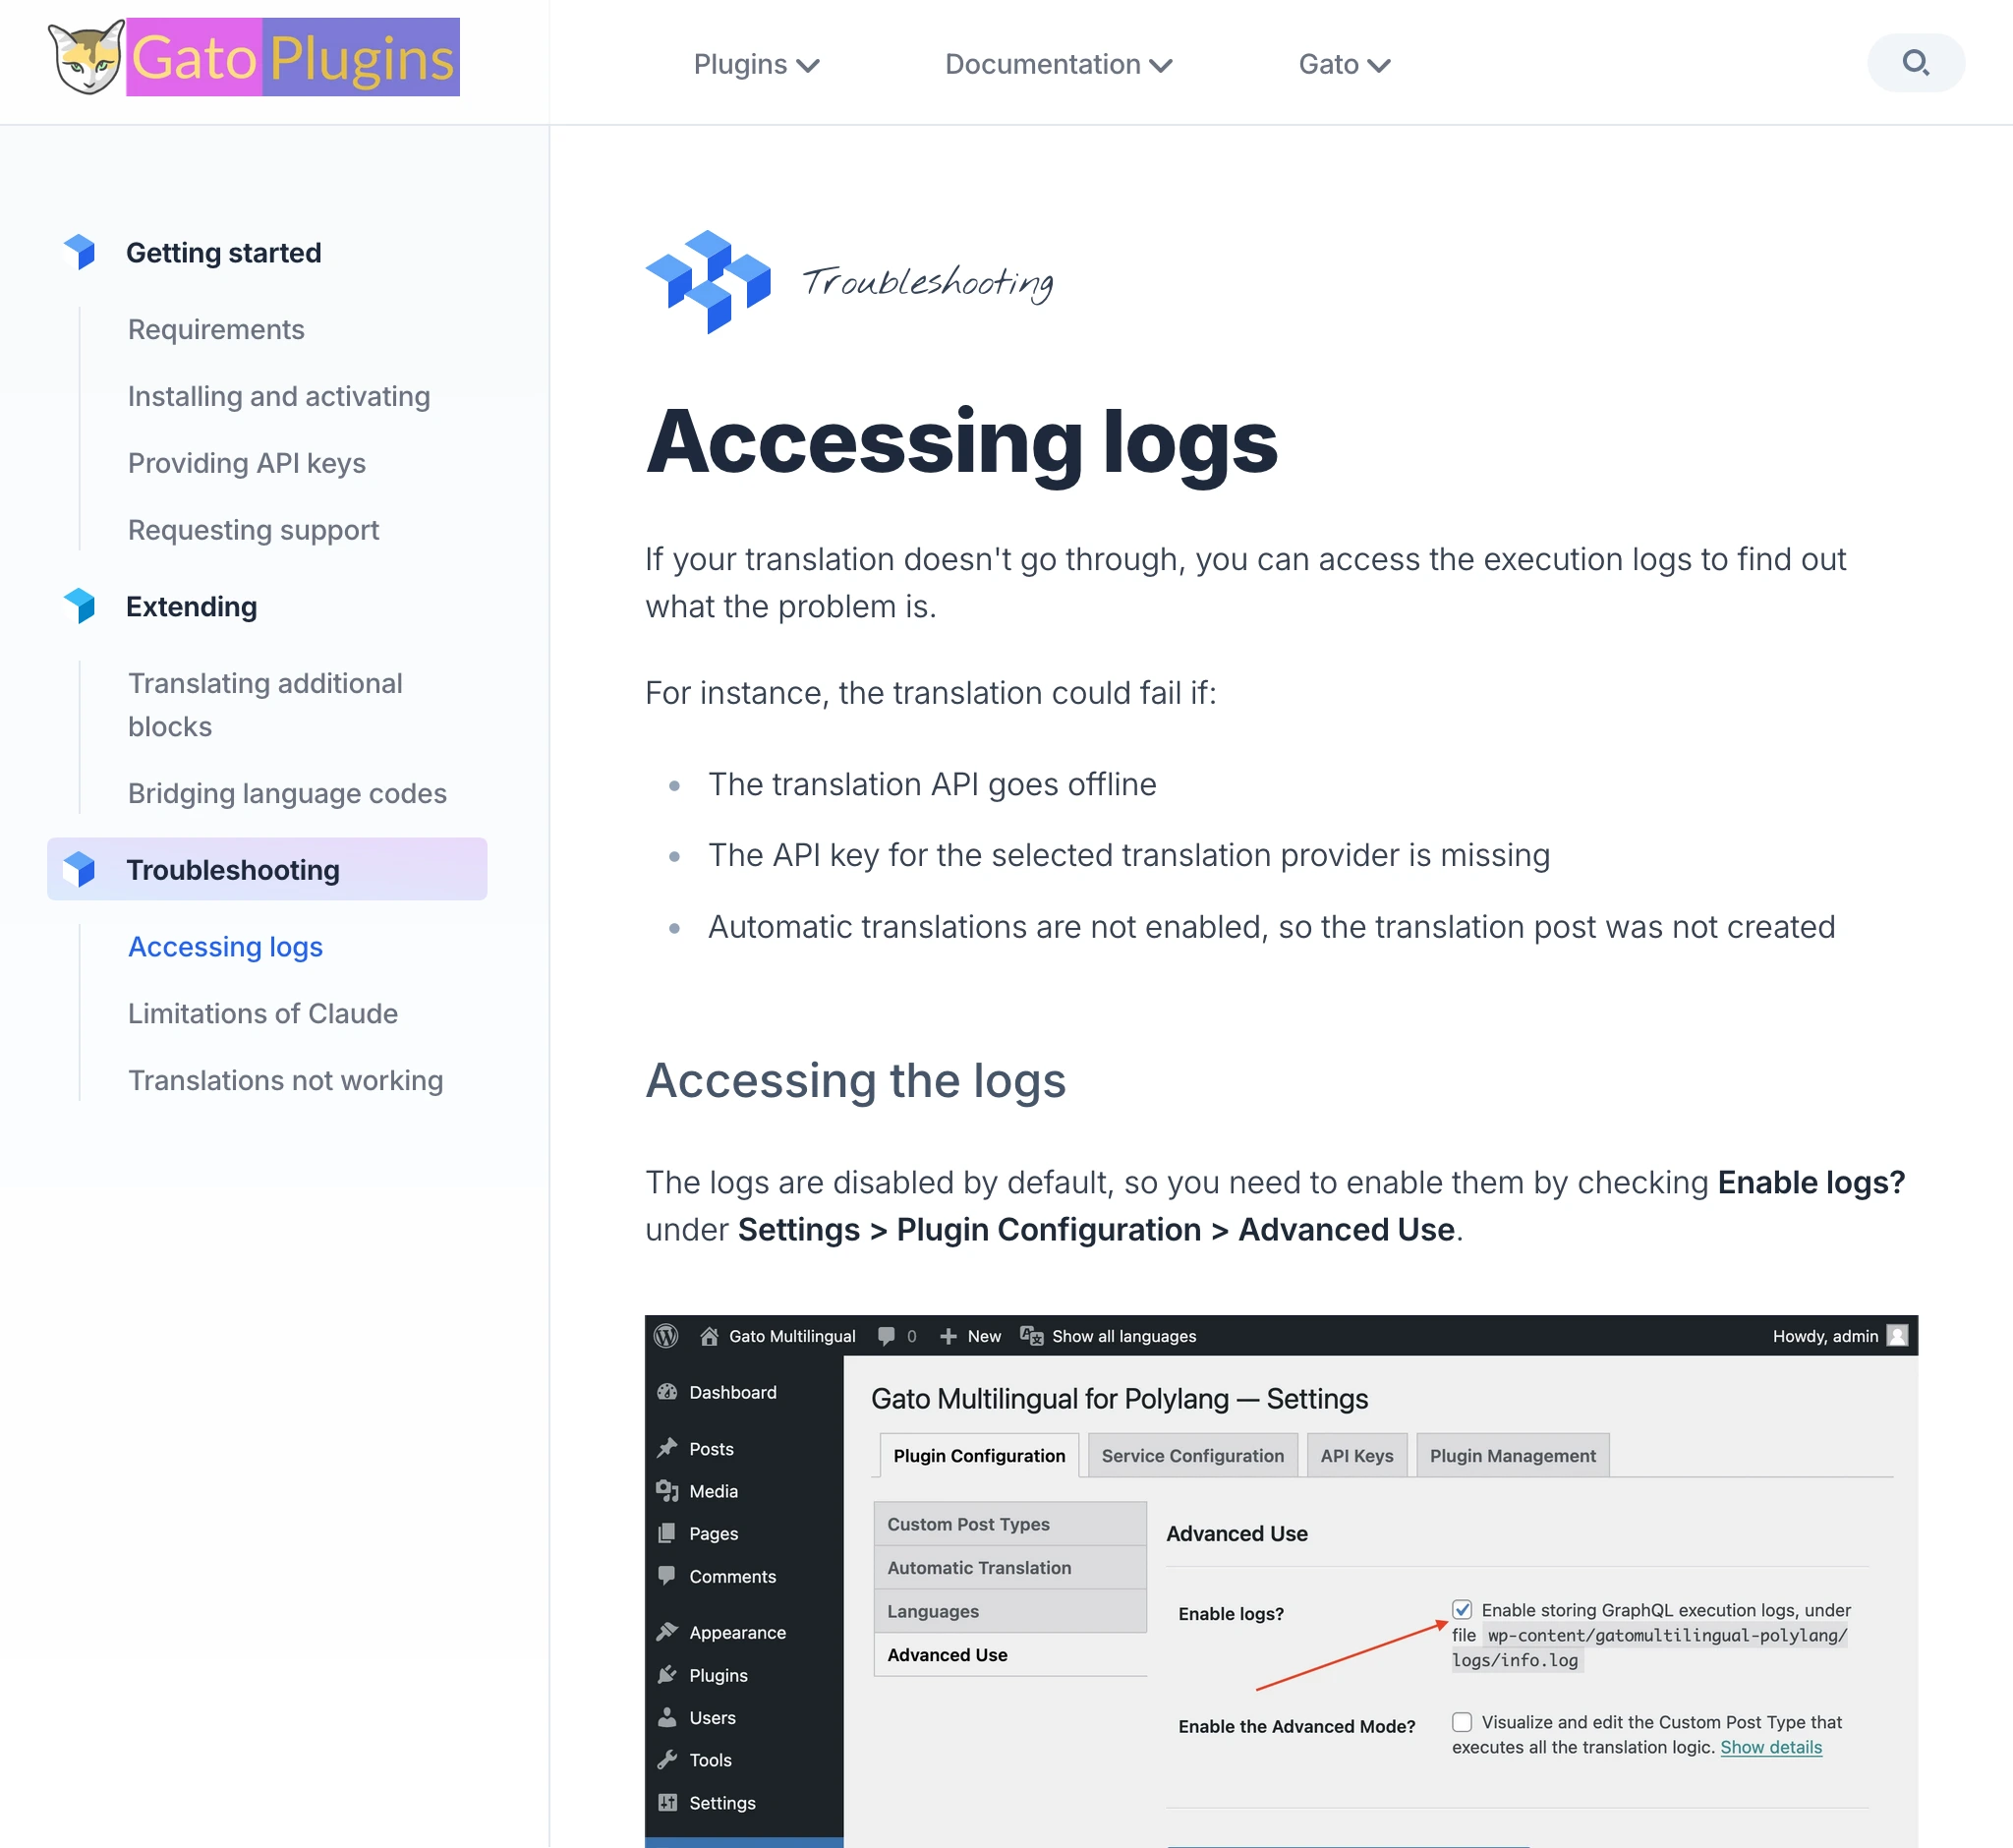
文档板块也是相同的:
有时板块内容会有所不同,但底层基础是相同的。
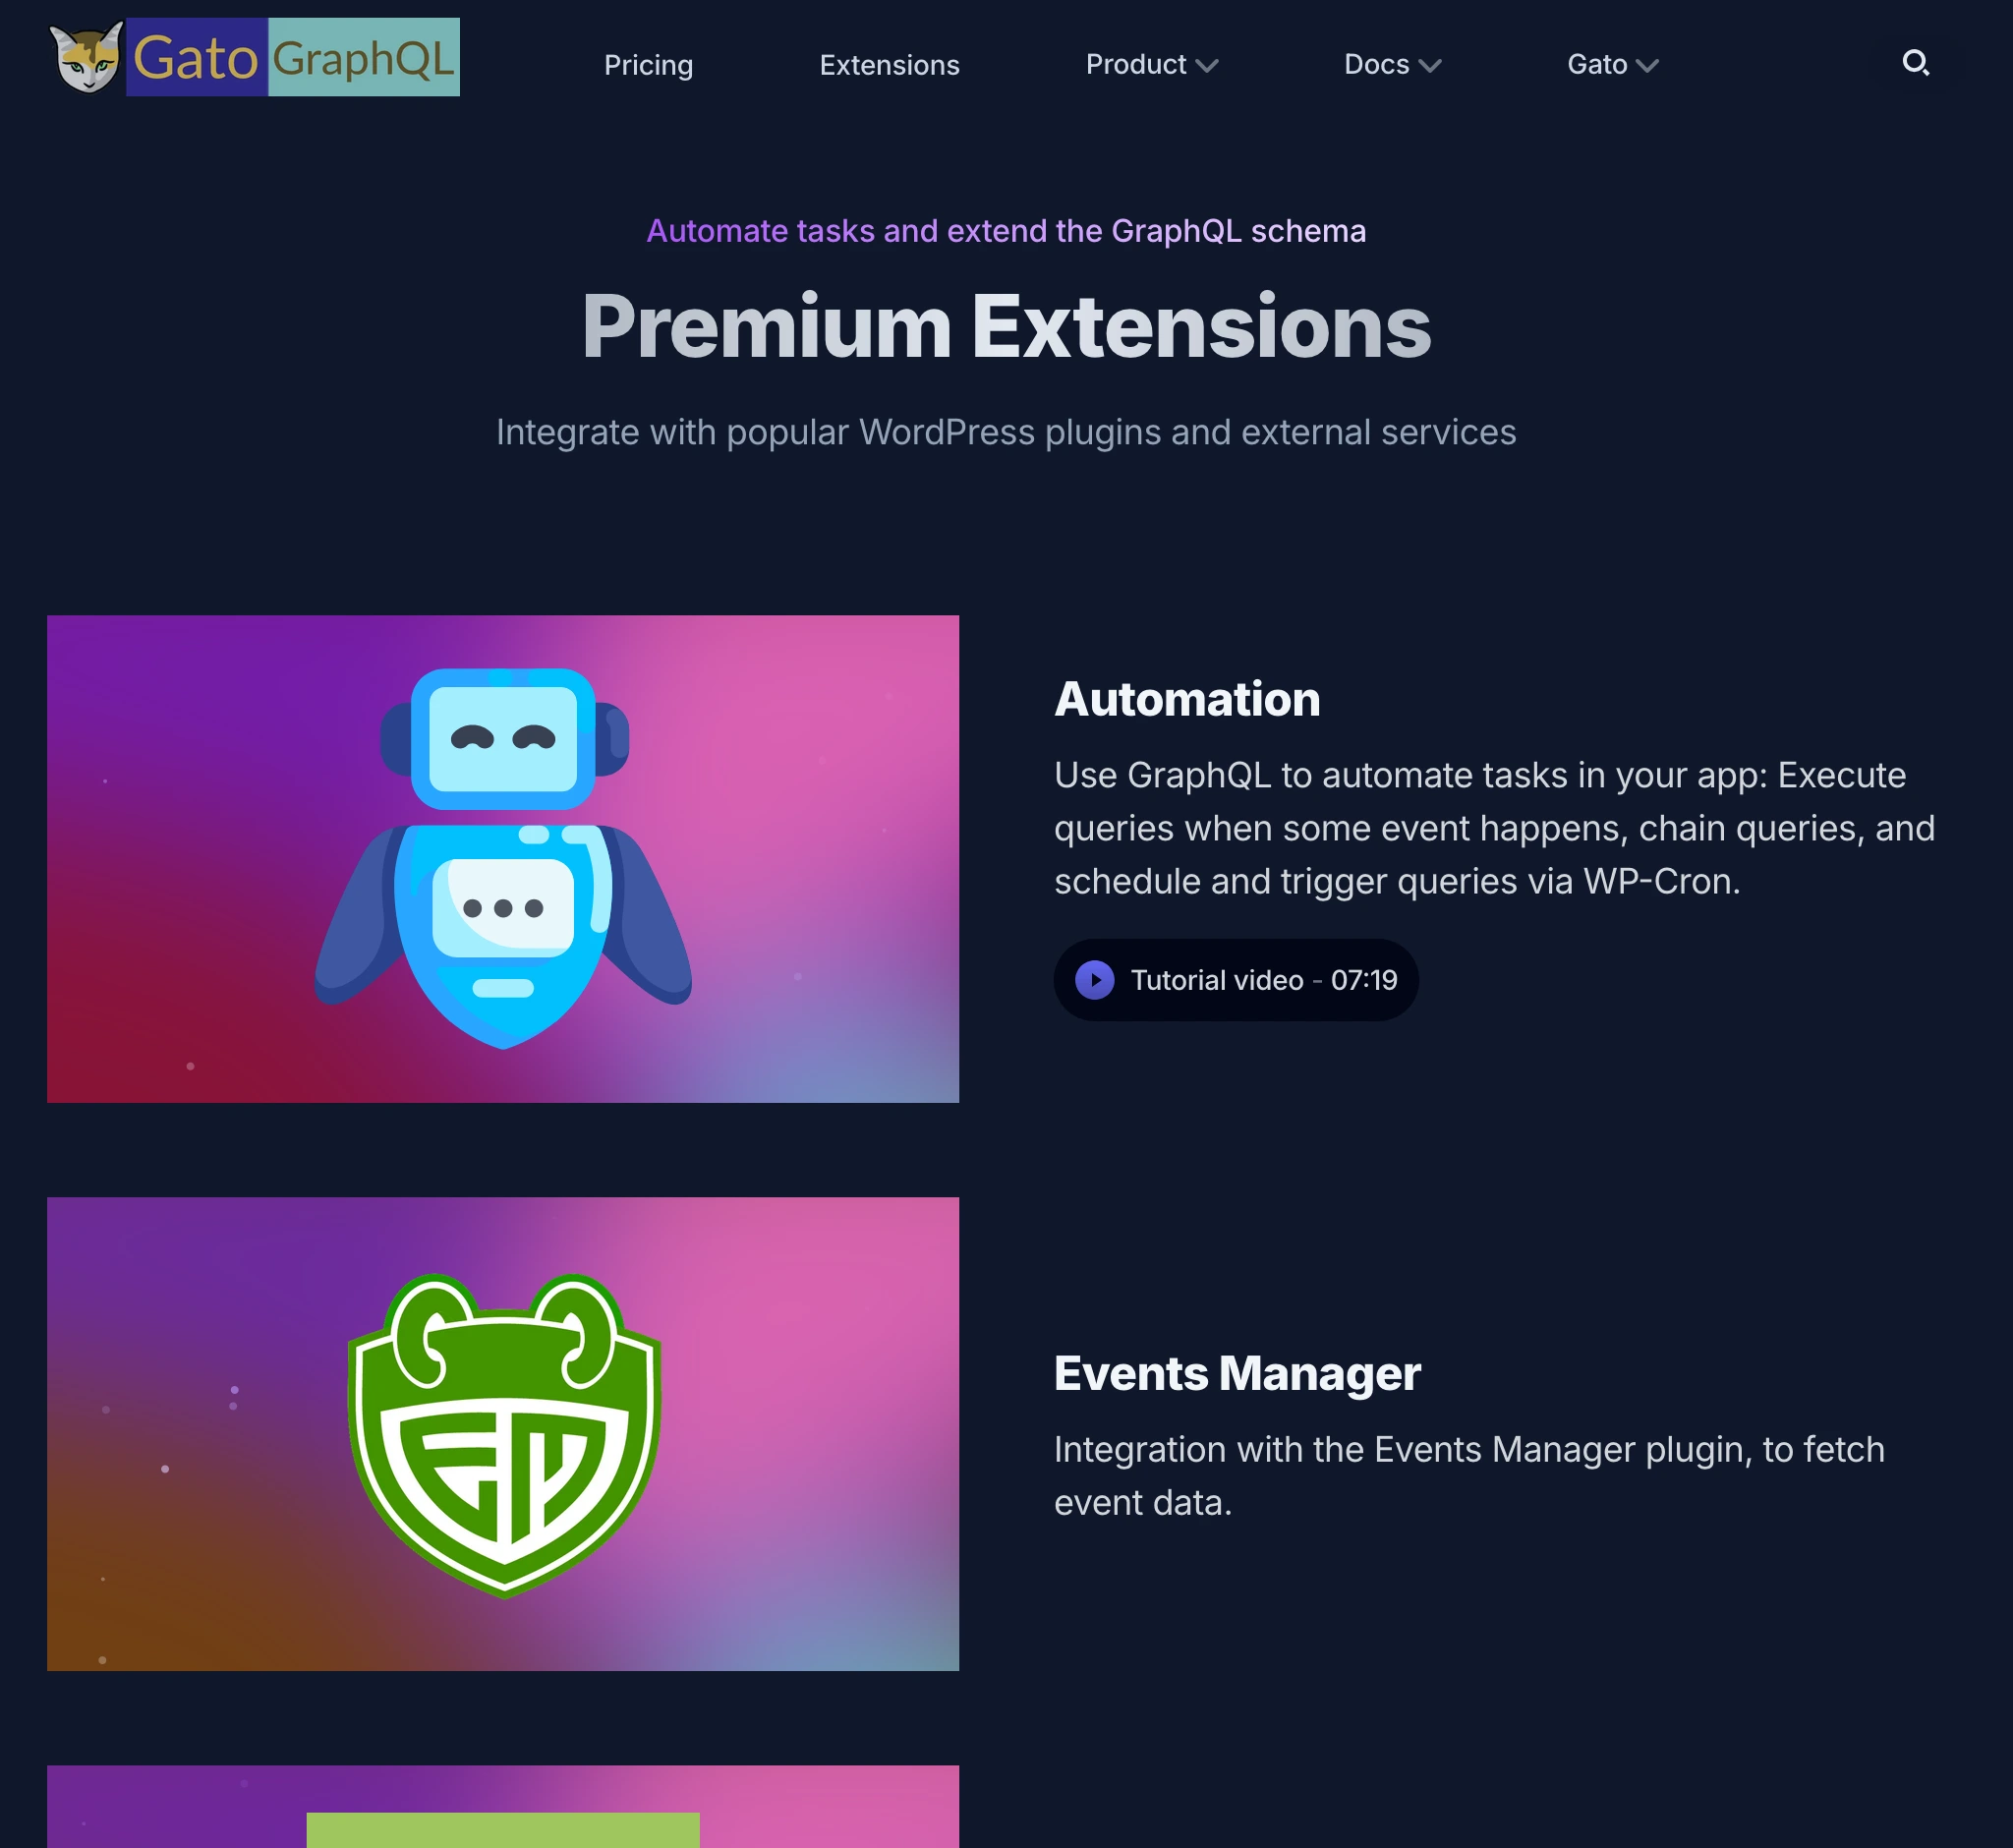
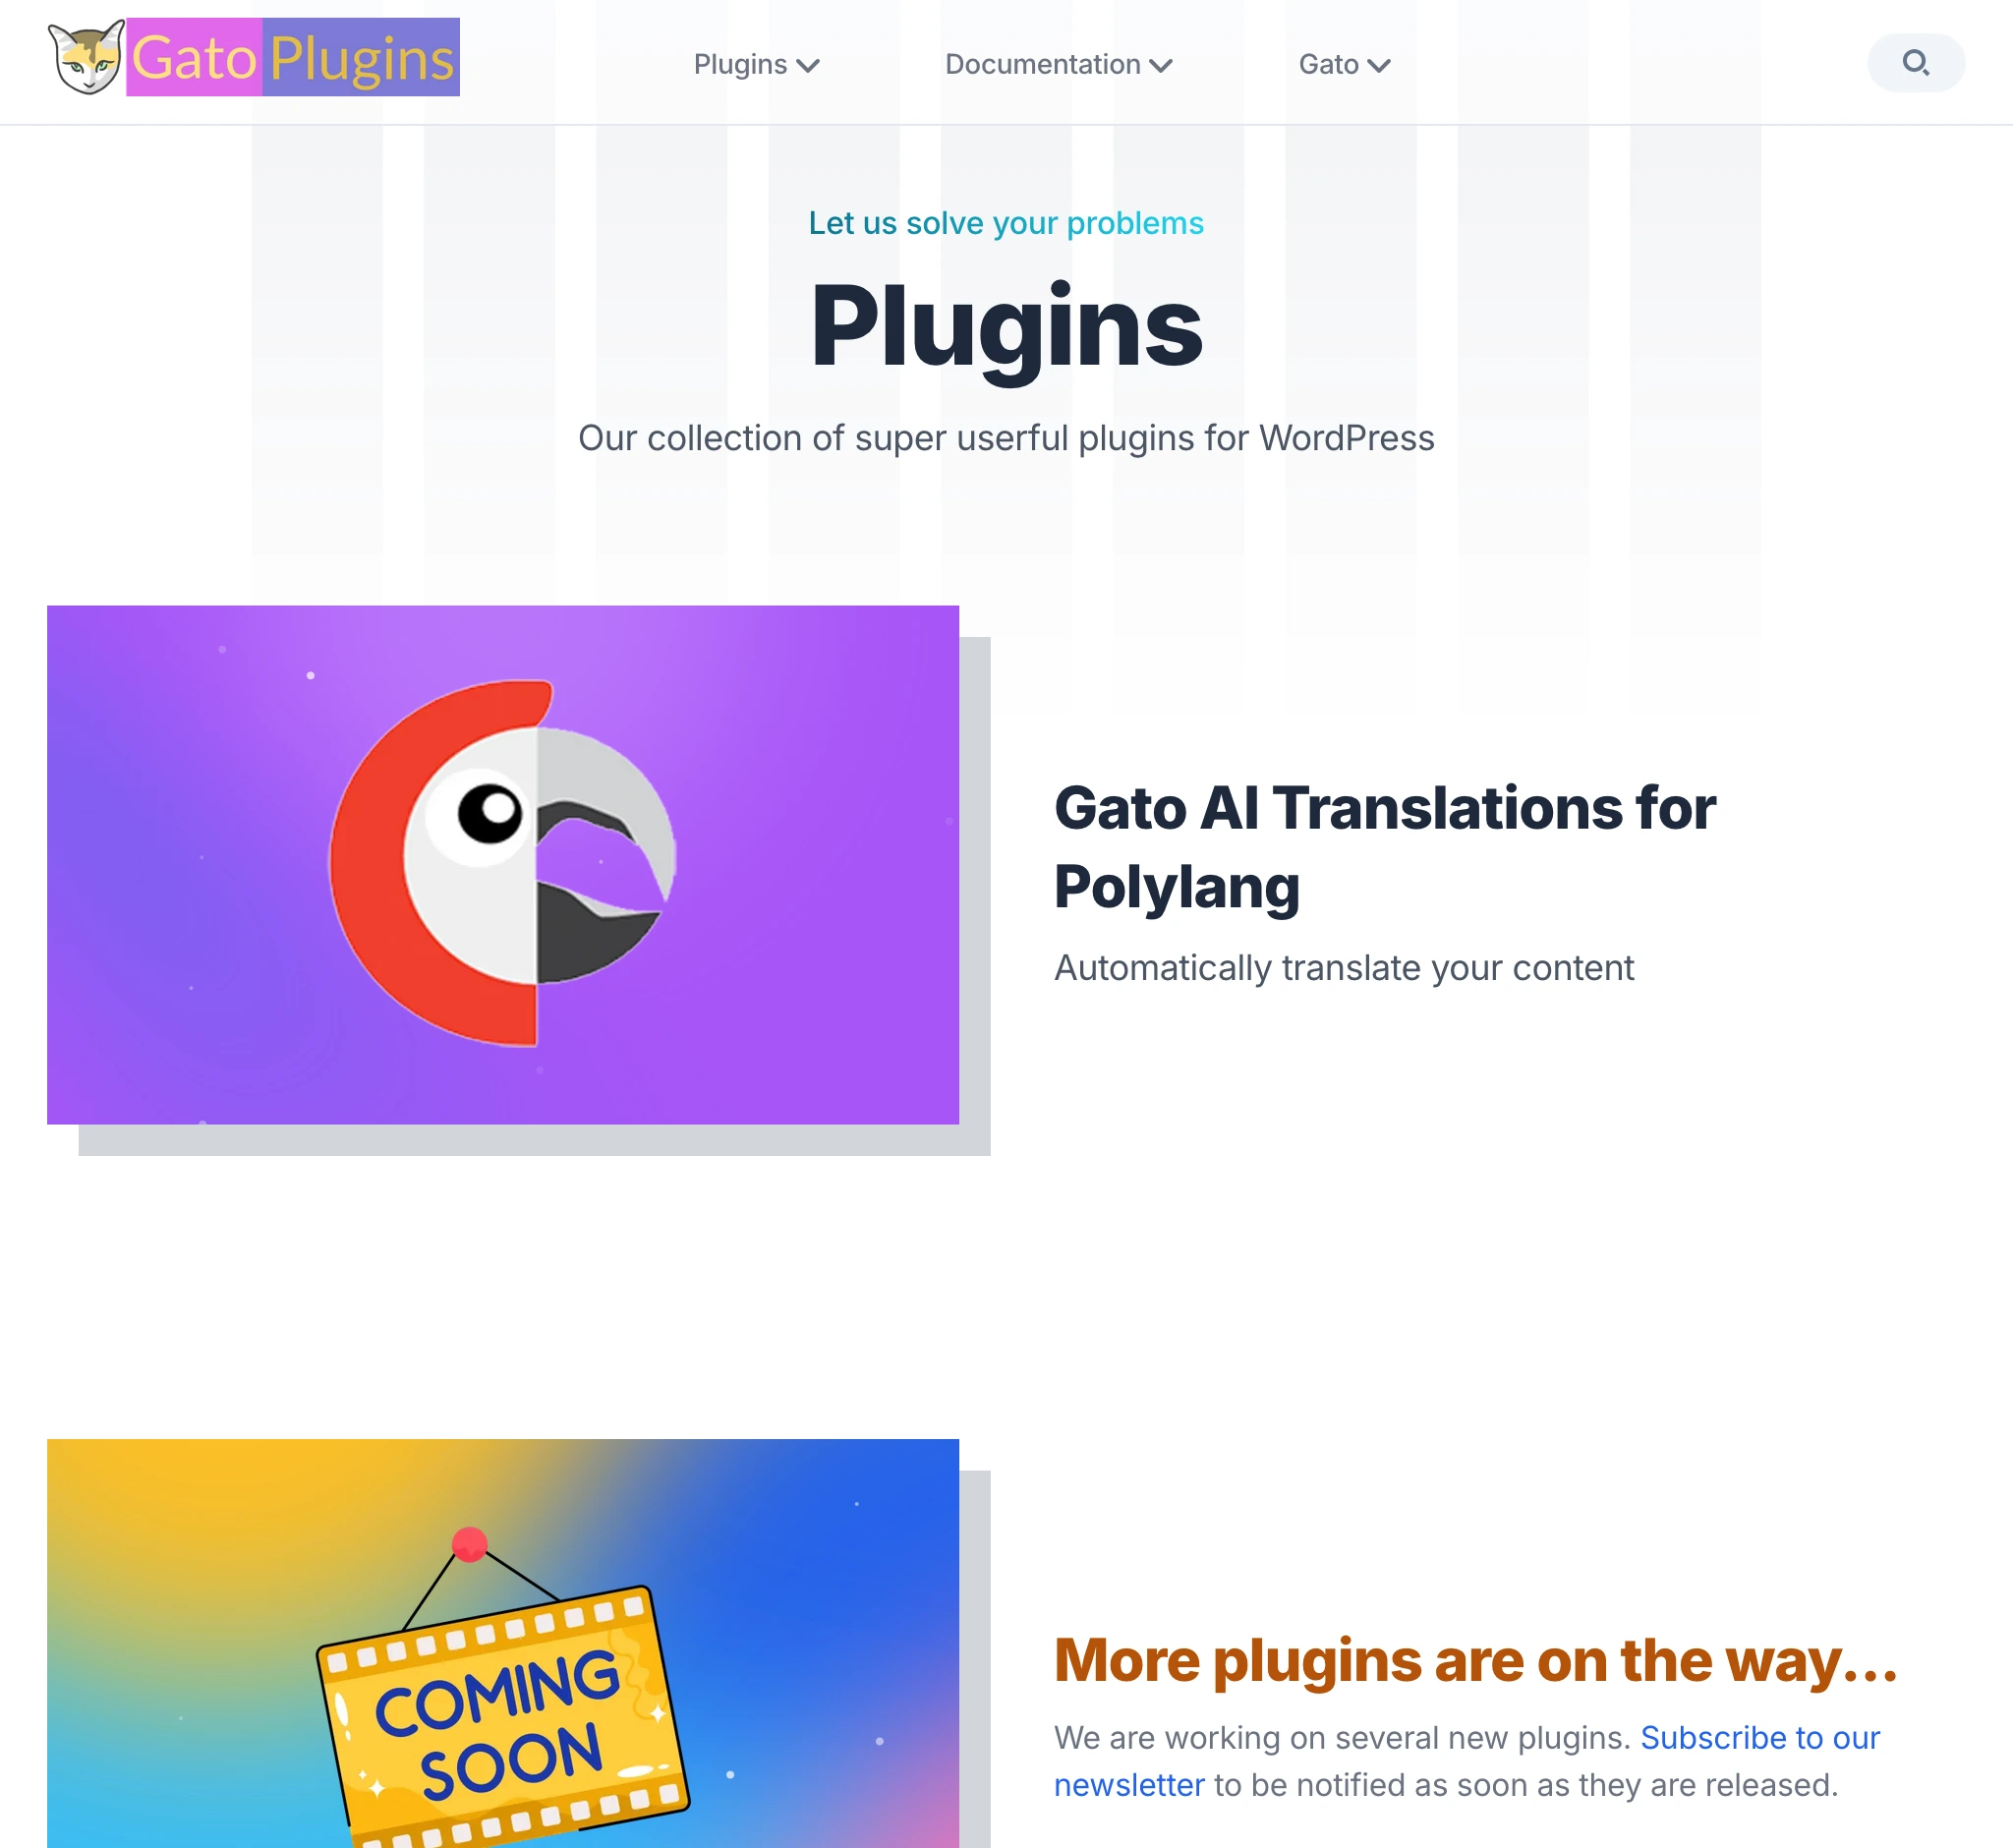
例如,Gato GraphQL 的扩展插件与 Gato Plugins 的插件使用相同的布局:
(顺便一提,两者的 Logo 也几乎一样!😜)
这篇博客文章也同时发布在两个站点上!😂
在 gatographql.com 上阅读:Building 2 Nextjs websites at the price of 1, by hacking the dark/light mode
不过,两个站点的文章之间恰好有 7 处不同。你能全部找出来吗?如果能,我将赠送你一张 Gato GraphQL 的折扣优惠券 🙏
为什么用明亮/暗黑模式来构建 2 个网站
原因有以下几点:
我没有时间和精力维护两套独立的代码库。我需要保持简单。
花在网站上的每一个小时,都是无法用于产品开发的时间。
我希望它们外观相似,让用户能够识别出它们属于同一个家族。
我不是设计师。能做出那种外观和风格,我已经很满意了,不想从零重来。
换句话说:因为既省钱又省力。这为我节省了大量时间和精力,可以将它们投入到自己的产品中。
缺点是,这 2 个网站无法支持暗黑/明亮模式切换,风格是固定的,但这在可接受的范围内。
好了!那我们就动手来看看具体是怎么实现的吧。
技术栈:应用基于 Next.js,使用 Tailwind CSS 进行样式设计。
它是将 Cruip 的多个模板组合、按需定制而成的。(那些模板真的很漂亮!)
内容通过 Contentlayer 进行管理。
将公共代码提取到共享包中,并在 monorepo 中统一托管
由于两个网站的代码库相同,将它们放在一个 monorepo 中统一托管是理所当然的。
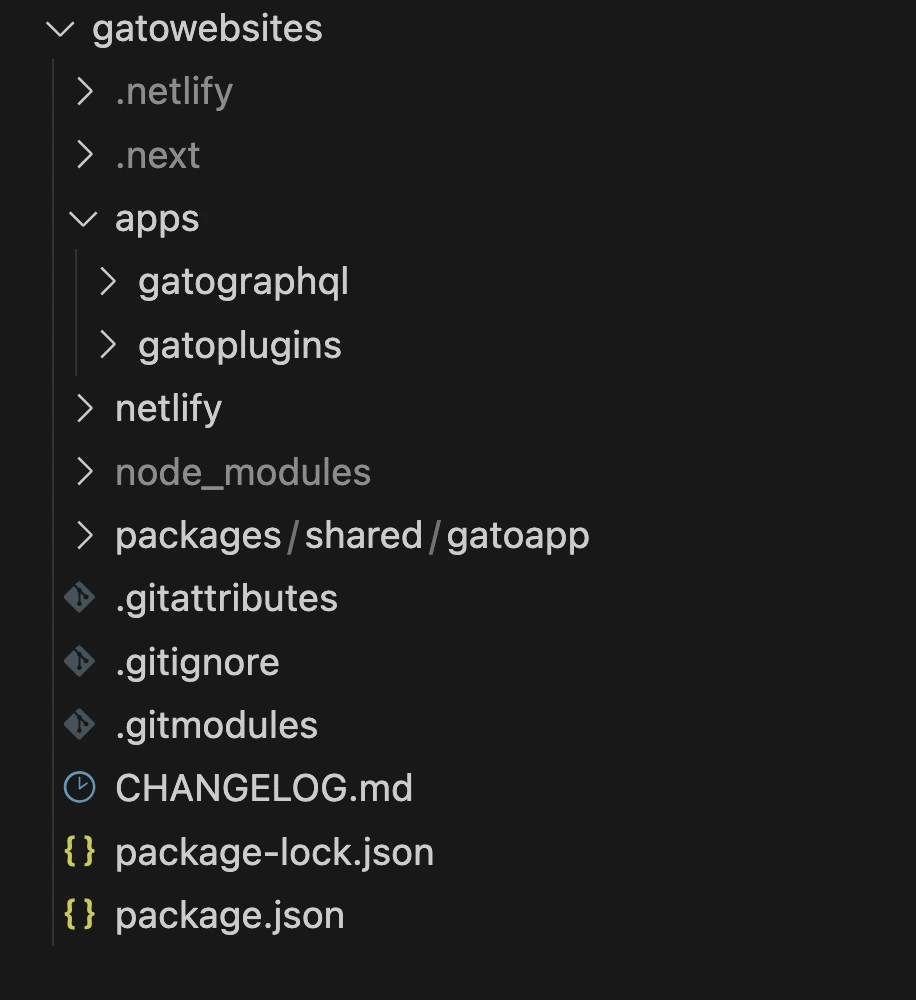
我的代码库最初只有一个项目:
- gatographql.com
重构后变为以下结构:
- apps/gatographql.com:Gato GraphQL 网站
- apps/gatoplugins.com:Gato Plugins 网站
- packages/shared/gatoapp:两个网站的共享代码
这是我在 VSCode 中的工作区:
我没有使用任何复杂的 monorepo 工具,简单的 workspaces 就能很好地完成工作。
monorepo 根目录下的 package.json 现在是这样的:
{
"name": "gatowebsites",
"version": "2.0.0",
"private": true,
"workspaces": [
"apps/*",
"packages/shared/*"
]
}此外,我在 package.json 中添加了用于运行/构建/部署两个项目的脚本(包括部署到两个站点所托管的 Netlify 的脚本):
{
"scripts": {
"dev-gatographql": "npm run dev --workspace=apps/gatographql",
"build-gatographql": "npm run build --workspace=apps/gatographql",
"deploy-gatographql": "npm run deploy-staging-gatographql",
"deploy-dev-gatographql": "netlify dev --filter gatographql",
"deploy-staging-gatographql": "netlify deploy --build --context deploy-preview --filter gatographql",
"deploy-prod-gatographql": "netlify deploy --build --prod --context production --filter gatographql",
"dev-gatoplugins": "npm run dev --workspace=apps/gatoplugins",
"build-gatoplugins": "npm run build --workspace=apps/gatoplugins",
"deploy-gatoplugins": "npm run deploy-staging-gatoplugins",
"deploy-dev-gatoplugins": "netlify dev --filter gatoplugins",
"deploy-staging-gatoplugins": "netlify deploy --build --context deploy-preview --filter gatoplugins",
"deploy-prod-gatoplugins": "netlify deploy --build --prod --context production --filter gatoplugins"
}
}将组件改造为通过 props 接收自定义数据
尽可能地将各网站的代码移入共享包,然后通过 props 来定制行为。
例如,共享包 gatoapp 包含一个 BlogSection 组件(用于在两个站点上渲染 /blog 页面):
import PopularPosts from 'gatoapp/components/blog/popular-posts'
import PageHeader from 'gatoapp/components/page-header'
import { BlogPostProps } from 'gatoapp/types/list-types'
import BlogSectionPostList from './blog-section-post-list'
import { useEffect, useState, Suspense } from "react";
export default function BlogSection({
blogPosts,
title = "Our Blog",
description,
campaignBanner,
}: {
blogPosts: BlogPostProps[],
title?: string,
description: string,
campaignBanner?: React.ReactNode
}) {
const sidebar = (
<aside className="hidden sm:block relative mt-12 md:mt-0 md:w-64 md:ml-12 lg:ml-20 md:shrink-0">
<PopularPosts
blogPosts={blogPosts}
/>
</aside>
)
return (
<div className="max-w-6xl mx-auto px-4 sm:px-6">
<div className="pt-32 pb-12 md:pt-40 md:pb-20">
{campaignBanner}
{/* Page header */}
<PageHeader
title={title}
description={description}
/>
{/* Main content */}
<BlogSectionPostList
blogPosts={blogPosts}
sidebar={sidebar}
/>
</div>
</div>
)
}所有内容都是相同的,除了以下几点:
- 页面标题(标题/描述)
- 博客文章
- 活动横幅
由于两个网站可以独立开展各自的活动,将 campaignBanner 作为 React.ReactNode 传入,不会对活动定制造成任何限制。
例如,在我发布这篇博客文章时,Gato GraphQL 正在开展一个活动,而 Gato Plugins 没有:

注入博客文章则需要更多一些逻辑。
注入博客文章
博客文章的数据通过 blogPosts prop 注入到 BlogSection 中。
由于我使用的是 Contentlayer,每个网站的根目录都会有一个 contentlayer.config.js 文件,用于定义站点上的类型。
这个配置文件无法移入共享包 gatoapp。因此,我们创建一个导出模块来提供共享类型的配置,然后在每个站点的 contentlayer.config.js 中导入,从而保持逻辑的 DRY 原则。
gatoapp 有一个提供共享类型 BlogPost 的导出模块 contentlayer.config.js:
import { defineDocumentType } from 'contentlayer2/source-files'
const BlogPost = defineDocumentType(() => ({
name: 'BlogPost',
filePathPattern: `blog/**/*.mdx`,
contentType: 'mdx',
fields: {
title: {
type: 'string',
required: true
},
publishedAt: {
type: 'date',
required: true
},
description: {
type: 'string',
required: true,
},
image: {
type: 'string',
},
},
computedFields: {
slug: {
type: 'string',
resolve: (doc) => doc._raw.flattenedPath.replace(new RegExp('^blog/?'), ''),
},
urlPath: {
type: 'string',
resolve: (doc) => `/blog/${doc._raw.flattenedPath.replace(new RegExp('^blog/?'), '')}`,
},
},
}))
module.exports = {
types: {
BlogPost: BlogPost,
},
}apps/gatographql.com 和 apps/gatoplugins.com 中的 contentlayer.config.js 都可以导入该类型:
import { makeSource } from 'contentlayer2/source-files'
import ContentLayerConfig from '../../packages/shared/gatoapp/contentlayer.config.js'
const BlogPost = ContentLayerConfig.types.BlogPost
export default makeSource({
documentTypes: [BlogPost],
})通常情况下,在代码中引用 BlogPost 类型时,会像这样导入:
import { BlogPost } from '@/.contentlayer/generated'然而,BlogPost 类型存在于网站侧,而非共享包中,因此共享代码无法直接引用该类型。
我们用一个 hack 来解决这个问题:从编译好的 Contentlayer 文件(位于 apps/gatographql/.contentlayer/generated/types.d.ts)中复制该类型的定义,并粘贴到共享包中的新文件 types.tsx 里:
import type { MDX, IsoDateTimeString } from 'contentlayer2/core'
export type BlogPost = {
// _id: string // not needed
// _raw: Local.RawDocumentData // not needed
type: 'BlogPost'
title: string
publishedAt: IsoDateTimeString
description: string
image?: string | undefined
body: MDX
slug: string,
urlPath: string,
}然后在共享代码中引用这个共享类型:
import { BlogPost } from 'gatoapp/types'由于网站侧和共享包中的 BlogPost 类型属性相同,可以将前者传递给期望后者的组件。
创建上下文以注入全局 props
导航菜单组件将在共享代码中渲染,但由于每个网站都有自己的菜单,需要通过网站侧的代码来提供。
菜单出现在所有页面上,我们不想每次都通过 props 传递。因此我们使用 React 上下文,只需注入一次导航菜单组件即可。
我们在共享包中创建一个名为 AppComponent 的上下文:
'use client'
import React from 'react'
import { createContext, useContext } from 'react'
import { StaticImageData } from 'next/image'
type ContextProps = {
header: {
menu: React.ReactNode,
mobileMenu: React.ReactNode,
},
}
const AppComponentContext = createContext<ContextProps>({
header: {
menu: <div></div>,
mobileMenu: <div></div>,
},
})
export interface AppComponentProviderInterface extends ContextProps {
children: React.ReactNode,
}
export default function AppComponentProvider({
children,
header,
}: AppComponentProviderInterface) {
return (
<AppComponentContext.Provider value={{ header }}>
{children}
</AppComponentContext.Provider>
)
}
export const useAppComponentProvider = () => useContext(AppComponentContext)在共享包中引用它:
'use client'
import Logo from './logo'
import HeaderMobile from './header-mobile'
import { useAppComponentProvider } from 'gatoapp/app/appcomponent-provider'
export default function Header() {
const AppComponent = useAppComponentProvider()
return (
<header className="fixed w-full z-50">
<div className={`absolute inset-0 bg-opacity-70 backdrop-blur -z-10 bg-white border-slate-200 border-b dark:border-b-0 dark:bg-transparent dark:border-slate-800`} aria-hidden="true"/>
<div className="max-w-6xl mx-auto px-4 sm:px-6">
<div className="flex items-center justify-between h-16">
{/* Site branding */}
<div className="flex-1">
<Logo />
</div>
<nav className="hidden md:flex md:grow">
{/* Desktop menu links */}
{AppComponent.header.menu}
</nav>
<HeaderMobile />
</div>
</div>
</header>
)
}然后通过网站侧代码在 apps/gatographql/app/(default)/layout.tsx 中注入:
import AppComponentProvider from 'gatoapp/app/appcomponent-provider'
import HeaderMenu from '@/components/menu/header-menu'
import HeaderMobileMenu from '@/components/menu/header-mobile-menu'
import DefaultLayout from 'gatoapp/app/(default)/layout'
export default function AppDefaultLayout({
children,
}: {
children: React.ReactNode
}) {
return (
<AppComponentProvider
header={{
menu: <HeaderMenu />,
mobileMenu: <HeaderMobileMenu />,
}}
>
<DefaultLayout>
{children}
</DefaultLayout>
</AppComponentProvider>
)
}最后,网站侧实现自己的 HeaderMenu 组件:
import Link from 'next/link'
import Dropdown from 'gatoapp/components/utils/dropdown'
export default function HeaderMenu() {
return (
<ul className="flex grow justify-center flex-wrap items-center">
<li>
<Link href="/pricing">Pricing</Link>
</li>
<li>
<Link href='/extensions'>Extensions</Link>
</li>
<Dropdown title="Product">
<li>
<Link href='/features'>Features</Link>
</li>
<li>
<Link href='/highlights'>Highlights</Link>
</li>
<li>
<Link href='/demos'>Demos</Link>
</li>
<li>
<Link href='/comparisons'>Comparisons</Link>
</li>
<li>
<Link href='/roadmap'>Roadmap</Link>
</li>
</Dropdown>
</ul>
)
}明亮模式和暗黑模式的样式
在 Tailwind 中,在类名前加上 dark: 即可在暗黑模式启用时应用该样式。
因此,共享包中的代码必须同时包含明亮和暗黑两种变体的样式。
例如,PageHeader 组件在明亮模式(text-gray-600)和暗黑模式(dark:text-slate-400)下使用不同的颜色来显示描述文字:
export default function PageHeader({
title,
description,
children,
}: {
title: string,
description?: string,
children?: React.ReactNode,
}) {
return (
<div className="max-w-3xl mx-auto text-center">
<h1 className="h1 pb-4">{title}</h1>
{description && (
<div className="max-w-3xl mx-auto">
<p className="text-gray-600 dark:text-slate-400">{description}</p>
</div>
)}
{children}
</div>
)
}为站点设置明亮或暗黑模式
gatographql.com 使用暗黑模式。通过在 apps/gatographql/app/layout.tsx 文件的 <body> 中添加类名 dark 来定义(同时添加样式类名 bg-slate-900 text-slate-100):
import { Inter } from 'next/font/google'
import RootLayoutHeader from 'gatoapp/app/layout-header'
const inter = Inter({
subsets: ['latin'],
variable: '--font-inter',
display: 'swap'
})
export default function RootLayout({
children,
}: {
children: React.ReactNode
}) {
return (
<html lang="en">
<RootLayoutHeader />
<body className={`${inter.variable} dark bg-slate-900 text-slate-100`}>
{children}
</body>
</html>
)
}gatoplugins.com 使用明亮模式。这是默认模式,因此无需向 <body> 添加任何特定类名(只需添加样式类名 bg-white text-slate-700):
import { Inter } from 'next/font/google'
import RootLayoutHeader from 'gatoapp/app/layout-header'
const inter = Inter({
subsets: ['latin'],
variable: '--font-inter',
display: 'swap'
})
export default function RootLayout({
children,
}: {
children: React.ReactNode
}) {
return (
<html lang="en">
<RootLayoutHeader />
<body className={`${inter.variable} bg-white text-slate-700`}>
{children}
</body>
</html>
)
}总结
我现在拥有了 2 个网站,却只付出了 1 个的代价。我对此非常满意。
快去找出那 7 处不同,领取你的奖品吧!😅
